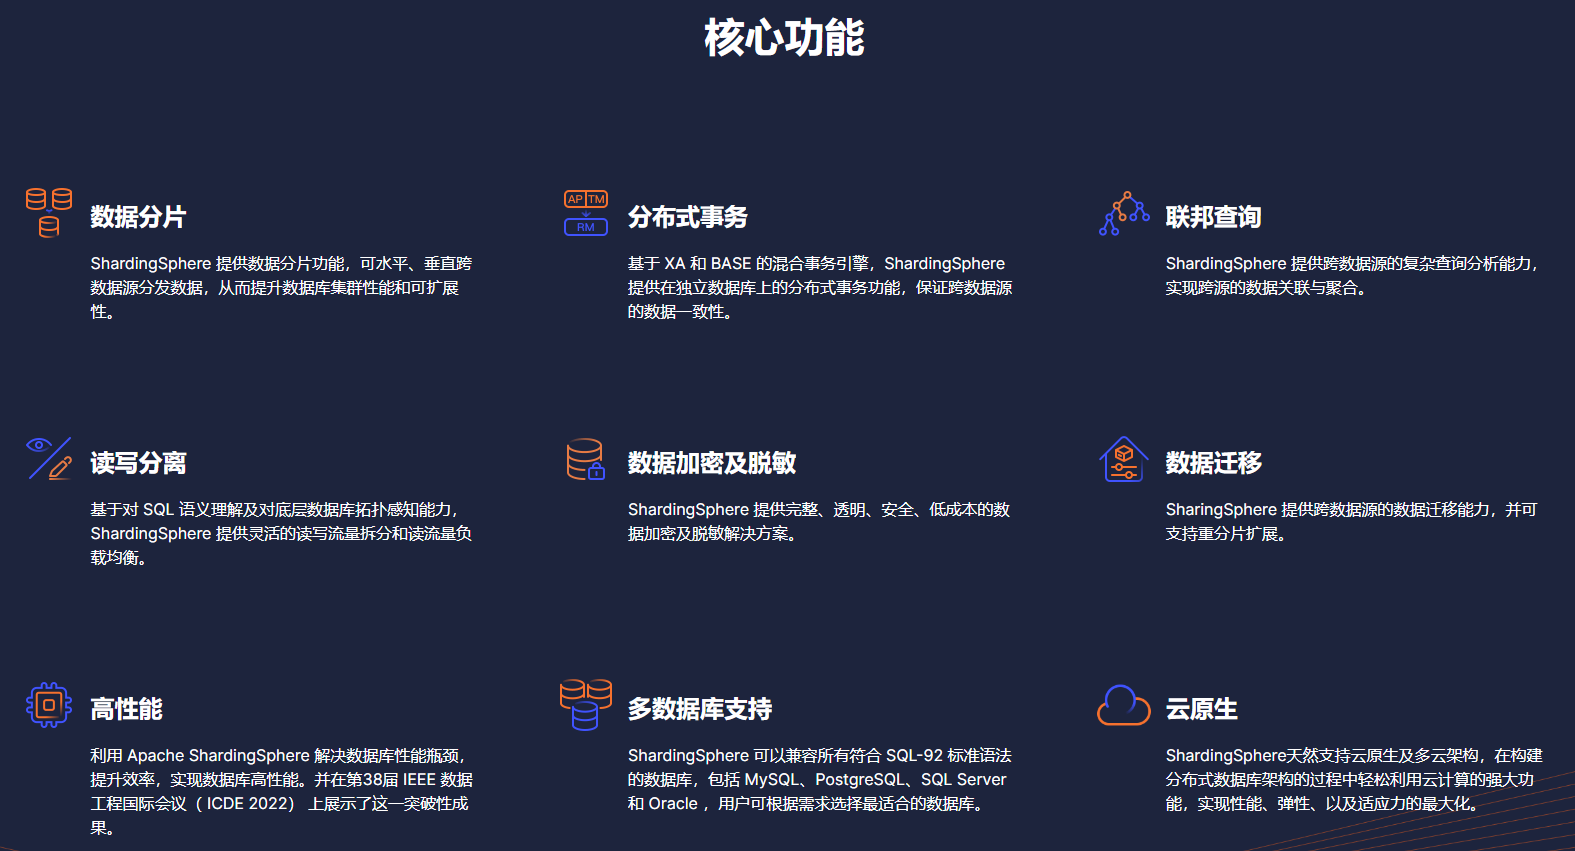
一、什么是 ShardingSphere
简介:
  https://shardingsphere.apache.org/document/legacy/4.x/document/cn/overview/
  https://shardingsphere.apache.org/document/current/cn/overview/
二、使用SHARDING-JDBC
2.1 使用手册
数据分片
读写分离
强制路由
编排治理
分布式事务
数据脱敏
2.2 配置手册
2.3 分片集成步骤
1. 引入maven依赖
<!-- for spring boot -->
<dependency>
    <groupId>org.apache.shardingsphere</groupId>
    <artifactId>sharding-jdbc-spring-boot-starter</artifactId>
    <version>${sharding-sphere.version}</version>
</dependency>

<!-- for spring namespace -->
<dependency>
    <groupId>org.apache.shardingsphere</groupId>
    <artifactId>sharding-jdbc-spring-namespace</artifactId>
    <version>${sharding-sphere.version}</version>
</dependency>
2. 规则配置
Sharding-JDBC可以通过Java,YAML,Spring命名空间和Spring Boot Starter四种方式配置,开发者可根据场景选择适合的配置方式。详情请参见配置手册。
3. 创建DataSource
通过ShardingDataSourceFactory工厂和规则配置对象获取ShardingDataSource,ShardingDataSource实现自JDBC的标准接口DataSource。然后即可通过DataSource选择使用原生JDBC开发,或者使用JPA, MyBatis等ORM工具。
DataSource dataSource = ShardingDataSourceFactory.createDataSource(dataSourceMap, shardingRuleConfig, props);
4.基于Java编码的规则配置
Sharding-JDBC的分库分表通过规则配置描述,以下例子是根据user_id取模分库, 且根据order_id取模分表的两库两表的配置。
// 配置真实数据源
    Map<String, DataSource> dataSourceMap = new HashMap<>();

    // 配置第一个数据源
    BasicDataSource dataSource1 = new BasicDataSource();
    dataSource1.setDriverClassName("com.mysql.jdbc.Driver");
    dataSource1.setUrl("jdbc:mysql://localhost:3306/ds0");
    dataSource1.setUsername("root");
    dataSource1.setPassword("");
    dataSourceMap.put("ds0", dataSource1);

    // 配置第二个数据源
    BasicDataSource dataSource2 = new BasicDataSource();
    dataSource2.setDriverClassName("com.mysql.jdbc.Driver");
    dataSource2.setUrl("jdbc:mysql://localhost:3306/ds1");
    dataSource2.setUsername("root");
    dataSource2.setPassword("");
    dataSourceMap.put("ds1", dataSource2);

    // 配置Order表规则
    TableRuleConfiguration orderTableRuleConfig = new TableRuleConfiguration("t_order","ds${0..1}.t_order${0..1}");

    // 配置分库 + 分表策略
    orderTableRuleConfig.setDatabaseShardingStrategyConfig(new InlineShardingStrategyConfiguration("user_id", "ds${user_id % 2}"));
    orderTableRuleConfig.setTableShardingStrategyConfig(new InlineShardingStrategyConfiguration("order_id", "t_order${order_id % 2}"));

    // 配置分片规则
    ShardingRuleConfiguration shardingRuleConfig = new ShardingRuleConfiguration();
    shardingRuleConfig.getTableRuleConfigs().add(orderTableRuleConfig);

    // 省略配置order_item表规则...
    // ...

    // 获取数据源对象
    DataSource dataSource = ShardingDataSourceFactory.createDataSource(dataSourceMap, shardingRuleConfig, new Properties());
2.4 详细示例
案例1:单库多表
一个库中有2个订单表,按照订单id取模,将数据路由到指定的表。
###SQL脚本
drop database if exists sj_ds0;
create database sj_ds0;
use sj_ds0;
drop table if exists t_order_0;
create table t_order_0(
    order_id bigint not null primary key,
    user_id bigint not null,
    price bigint not null
);
drop table if exists t_order_1;
create table t_order_1(
    order_id bigint not null primary key,
    user_id bigint not null,
    price bigint not null
);
drop table if exists t_user;
create table t_user(
    id bigint not null primary key auto_increment,
    name varchar(128) not null
);
java代码:
import com.zaxxer.hikari.HikariDataSource;
import org.apache.shardingsphere.api.config.sharding.ShardingRuleConfiguration;
import org.apache.shardingsphere.api.config.sharding.TableRuleConfiguration;
import org.apache.shardingsphere.api.config.sharding.strategy.InlineShardingStrategyConfiguration;
import org.apache.shardingsphere.shardingjdbc.api.ShardingDataSourceFactory;
import org.apache.shardingsphere.underlying.common.config.properties.ConfigurationPropertyKey;
import javax.sql.DataSource;
import java.sql.Connection;
import java.sql.PreparedStatement;
import java.sql.SQLException;
import java.util.HashMap;
import java.util.Map;
import java.util.Properties;
public class Demo1 {
    public static void main(String[] args) throws SQLException {
        /**
         * 1、配置真实数据源
         */
        Map<String, DataSource> dataSourceMap = new HashMap<>();
        dataSourceMap.put("ds0", dataSource1());
        /**
         * 2.配置表的规则
         */
        TableRuleConfiguration orderTableRuleConfig = new TableRuleConfiguration("t_order", "ds0.t_order_$->{0..1}");
        // 指定表的分片策略(分片字段+分片算法)
        orderTableRuleConfig.setTableShardingStrategyConfig(new InlineShardingStrategyConfiguration("order_id", "t_order_$->{order_id % 2}"));
        /**
         * 3、分片规则
         */
        ShardingRuleConfiguration shardingRuleConfig = new ShardingRuleConfiguration();
        //将表的分片规则加入到分片规则列表
        shardingRuleConfig.getTableRuleConfigs().add(orderTableRuleConfig);
        /**
         * 4、配置一些属性
         */
        Properties props = new Properties();
        //输出sql
        props.put(ConfigurationPropertyKey.SQL_SHOW.getKey(), true);
        /**
         * 5、创建数据源
         */
        DataSource dataSource = ShardingDataSourceFactory.
                createDataSource(dataSourceMap, shardingRuleConfig, props);
        /**
         * 6、获取连接,执行sql
         */
        Connection connection = dataSource.getConnection();
        connection.setAutoCommit(false);
        /**
         * 测试向t_order表插入8条数据,8条数据会分散到2个表
         */
        PreparedStatement ps = connection.prepareStatement("insert into t_order (order_id,user_id,price) values (?,?,?)");
        for (long i = 1; i <= 8; i++) {
            int j = 1;
            ps.setLong(j++, i);
            ps.setLong(j++, i);
            ps.setLong(j, 100 * i);
            System.out.println(ps.executeUpdate());
        }
        connection.commit();
        ps.close();
        connection.close();
    }
    private static DataSource dataSource1() {
        HikariDataSource dataSource1 = new HikariDataSource();
        dataSource1.setDriverClassName("com.mysql.jdbc.Driver");
        dataSource1.setJdbcUrl("jdbc:mysql://localhost:3306/sj_ds0?characterEncoding=UTF-8");
        dataSource1.setUsername("root");
        dataSource1.setPassword("root123");
        return dataSource1;
    }
}
三、分片算法策略
上面介绍的案例,db的路由、表的路由都是采用取模的方式,这种方式存在一个问题:
当查询条件是>, <, >=, <=、BETWEEN AND的时候,就无能为力了,此时要用其他的分片策略来解决,下面来看看如何解决。
3.1 分片策略算法知识点
白话解释分片策略
当我们使用分库分表的时候,目标库和表都存在多个,此时执行sql,那么sql最后会落到哪个库?那个表呢?
这就是分片策略需要解决的问题,主要解决2个问题:
sql应该到哪个库去执行?这个就是数据库路由策略决定的
sql应该到哪个表去执行呢?这个就是表的路由策略决定的
所以如果要对某个表进行分库分表,需要指定则两个策略
db路由策略,通过TableRuleConfiguration#setDatabaseShardingStrategyConfig进行设置
table路由策略,通过TableRuleConfiguration#setTableShardingStrategyConfig进行设置
分片键
用于分片的数据库字段,是将数据库(表)水平拆分的关键字段。例:将订单表中的订单主键的尾数取模分片,则订单主键为分片字段。 SQL中如果无分片字段,将执行全路由,性能较差。 除了对单分片字段的支持,ShardingSphere也支持根据多个字段进行分片。
分片算法
通过分片算法将数据分片,支持通过=、>=、<=、>、<、BETWEEN和IN分片。分片算法需要应用方开发者自行实现,可实现的灵活度非常高。
目前提供4种分片算法。由于分片算法和业务实现紧密相关,因此并未提供内置分片算法,而是通过分片策略将各种场景提炼出来,提供更高层级的抽象,并提供接口让应用开发者自行实现分片算法。
精确分片算法
对应PreciseShardingAlgorithm,用于处理使用单一键作为分片键的=与IN进行分片的场景。需要配合StandardShardingStrategy使用。
范围分片算法
对应RangeShardingAlgorithm,用于处理使用单一键作为分片键的BETWEEN AND、>、<、>=、<=进行分片的场景。需要配合StandardShardingStrategy使用。
复合分片算法
对应ComplexKeysShardingAlgorithm,用于处理使用多键作为分片键进行分片的场景,包含多个分片键的逻辑较复杂,需要应用开发者自行处理其中的复杂度。需要配合ComplexShardingStrategy使用。
Hint分片算法
对应HintShardingAlgorithm,用于处理使用Hint行分片的场景。需要配合HintShardingStrategy使用。
5种分片策略
包含分片键和分片算法,由于分片算法的独立性,将其独立抽离。真正可用于分片操作的是分片键 + 分片算法,也就是分片策略。目前提供5种分片策略。
行表达式分片策略(InlineShardingStrategy)
对应InlineShardingStrategy。使用Groovy的表达式,提供对SQL语句中的=和IN的分片操作支持,只支持单分片键。对于简单的分片算法,可以通过简单的配置使用,从而避免繁琐的Java代码开发,如: t_user_$->{u_id % 8} 表示t_user表根据u_id模8,而分成8张表,表名称为t_user_0到t_user_7。
标准分片策略(StandardShardingStrategy)
对应StandardShardingStrategy。提供对SQL语句中的=, >, <, >=, <=, IN和BETWEEN AND的分片操作支持。StandardShardingStrategy只支持单分片键,提供PreciseShardingAlgorithm和RangeShardingAlgorithm两个分片算法。PreciseShardingAlgorithm是必选的,用于处理=和IN的分片。RangeShardingAlgorithm是可选的,用于处理BETWEEN AND, >, <, >=, <=分片,如果不配置RangeShardingAlgorithm,SQL中的BETWEEN AND将按照全库路由处理。
复合分片策略(ComplexShardingStrategy)
对应ComplexShardingStrategy。复合分片策略。提供对SQL语句中的=, >, <, >=, <=, IN和BETWEEN AND的分片操作支持。ComplexShardingStrategy支持多分片键,由于多分片键之间的关系复杂,因此并未进行过多的封装,而是直接将分片键值组合以及分片操作符透传至分片算法,完全由应用开发者实现,提供最大的灵活度。
Hint分片策略(HintShardingStrategy)
对应HintShardingStrategy。通过Hint指定分片值而非从SQL中提取分片值的方式进行分片的策略。
不分片策略
对应NoneShardingStrategy。不分片的策略。
SQL Hint
对于分片字段非SQL决定,而由其他外置条件决定的场景,可使用SQL Hint灵活的注入分片字段。例:内部系统,按照员工登录主键分库,而数据库中并无此字段。SQL Hint支持通过Java API和SQL注释(待实现)两种方式使用。
3.2 分片场景及案例
3.2.1 行表达式分片策略(InlineShardingStrategy)
#适用场景
对应InlineShardingStrategy类
只支持单字段分片
通过分片字段查询,只支持=和in,不支持>=、<=、>、<、BETWEEN范围操作,否则报错
使用Groovy的表达式,对于简单的分片算法,可以通过简单的配置使用,从而避免繁琐的Java代码开发,如: t_user_$->{u_id % 8} 表示t_user表根据u_id模8,而分成8张表,表名称为t_user_0到t_user_7。
3.2.2 复合分片策略(ComplexShardingStrategy)
#适用场景
对应ComplexShardingStrategy类
提供对SQL语句中的=, >, <, >=, <=, IN和BETWEEN AND的分片操作支持
ComplexShardingStrategy支持多分片键,由于多分片键之间的关系复杂,因此并未进行过多的封装,而是直接将分片键值组合以及分片操作符透传至分片算法,完全由应用开发者实现,提供最大的灵活度。
3.2.3 强制路由策略(HintShardingStrategy)
ShardingSphere使用ThreadLocal管理分片键值进行Hint强制路由。可以通过编程的方式向HintManager中添加分片值,该分片值仅在当前线程内生效。
#适用场景
分片字段不存在SQL中、数据库表结构中
强制在主库进行某些数据操作
3.2.4 标准分片策略(StandardShardingStrategy)
#适用场景
对应StandardShardingStrategy类
提供对SQL语句中的=, >, <, >=, <=, IN和BETWEEN AND的分片操作支持
StandardShardingStrategy只支持单分片键,提供PreciseShardingAlgorithm和RangeShardingAlgorithm两个分片算法
PreciseShardingAlgorithm是必选的,用于处理=和IN的分片
RangeShardingAlgorithm是可选的,用于处理BETWEEN AND, >, <, >=, <=分片,如果不配置RangeShardingAlgorithm,SQL中的BETWEEN AND将按照全库路由处理
案例:
需求
ds_sss库中含有2个用户表:t_user_0、t_user_1
每个表有2个字段(id,name),id>0
t_user_0:存放id范围在[1,3]内的数据,为了测试方便,范围设置的比较小,重点在于能够掌握用法
t_user_1:存放id位于[4,+∞)范围内的数据
sql脚本
drop database if exists ds_sss;
create database ds_sss;
use ds_sss;
drop table if exists t_user_0;
create table t_user_0(
    id bigint not null primary key,
    name varchar(64) not null
);
drop table if exists t_user_1;
create table t_user_1(
    id bigint not null primary key,
    name varchar(64) not null
);
java代码:
import com.google.common.collect.Range;
import com.zaxxer.hikari.HikariDataSource;
import org.apache.shardingsphere.api.config.sharding.ShardingRuleConfiguration;
import org.apache.shardingsphere.api.config.sharding.TableRuleConfiguration;
import org.apache.shardingsphere.api.config.sharding.strategy.StandardShardingStrategyConfiguration;
import org.apache.shardingsphere.api.sharding.standard.PreciseShardingAlgorithm;
import org.apache.shardingsphere.api.sharding.standard.PreciseShardingValue;
import org.apache.shardingsphere.api.sharding.standard.RangeShardingAlgorithm;
import org.apache.shardingsphere.api.sharding.standard.RangeShardingValue;
import org.apache.shardingsphere.shardingjdbc.api.ShardingDataSourceFactory;
import org.apache.shardingsphere.underlying.common.config.properties.ConfigurationPropertyKey;
import org.junit.jupiter.api.BeforeAll;
import org.junit.jupiter.api.Test;
import javax.sql.DataSource;
import java.sql.Connection;
import java.sql.PreparedStatement;
import java.sql.ResultSet;
import java.sql.SQLException;
import java.util.*;
public class StandardShardingStrategyTest {
    private static DataSource dataSource;
    @BeforeAll
    public static void init() throws SQLException {
        HikariDataSource ds = new HikariDataSource();
        ds.setDriverClassName("com.mysql.jdbc.Driver");
        ds.setJdbcUrl("jdbc:mysql://localhost:3306/ds_sss?characterEncoding=UTF-8");
        ds.setUsername("root");
        ds.setPassword("root123");
        /**
         * 1.配置真实数据源
         */
        Map<String, DataSource> dataSourceMap = new LinkedHashMap<>();
        dataSourceMap.put("ds", ds);
        //创建一个Map用来存放:id范围和表名映射关系,路由的时候会根据这个信息来找到目标表
        Map<Range<Comparable>, String> idRangeTableNameMap = new HashMap<>();
        idRangeTableNameMap.put(Range.closed(1, 3), "t_user_0");
        idRangeTableNameMap.put(Range.atLeast(4), "t_user_1");
        System.out.println(idRangeTableNameMap);
        /**
         * 2、配置t_user分片规则
         */
        TableRuleConfiguration userRuleConfiguration = new TableRuleConfiguration("t_user", "ds.t_user_$->{0..1}");
        //设置 =,in 的算法策略
        PreciseShardingAlgorithm preciseShardingAlgorithm = new PreciseShardingAlgorithm() {
            @Override
            public String doSharding(Collection availableTargetNames, PreciseShardingValue shardingValue) {
                for (Map.Entry<Range<Comparable>, String> idRangeTableNameEntity : idRangeTableNameMap.entrySet()) {
                    final Range<Comparable> idRange = idRangeTableNameEntity.getKey();
                    final String tableName = idRangeTableNameEntity.getValue();
                    final Comparable id = shardingValue.getValue();
                    if (idRange.contains(id)) {
                        System.out.println(String.format("准确路由,id:%s, tableName:%s", id, tableName));
                        return tableName;
                    }
                }
                return null;
            }
        };
        //设置 BETWEEN AND, >, <, >=, <= 范围算法策略
        RangeShardingAlgorithm rangeShardingAlgorithm = new RangeShardingAlgorithm() {
            @Override
            public Collection<String> doSharding(Collection availableTargetNames, RangeShardingValue shardingValue) {
                List<String> tableNameList = new ArrayList<>();
                for (Map.Entry<Range<Comparable>, String> idRangeTableNameEntity : idRangeTableNameMap.entrySet()) {
                    final Range<Comparable> idRange = idRangeTableNameEntity.getKey();
                    final String tableName = idRangeTableNameEntity.getValue();
                    final Range valueRange = shardingValue.getValueRange();
                    //判断2个区间是否有交集
                    if (idRange.isConnected(valueRange)) {
                        tableNameList.add(tableName);
                    }
                }
                System.out.println(String.format("范围路由,id:%s, tableNameList:%s", shardingValue, tableNameList));
                return tableNameList;
            }
        };
        //配置标注路由策略
        final StandardShardingStrategyConfiguration userTableShardingStrategy =
                new StandardShardingStrategyConfiguration("id",
                        preciseShardingAlgorithm,
                        rangeShardingAlgorithm);
        //设置表的路由策略
        userRuleConfiguration.setTableShardingStrategyConfig(userTableShardingStrategy);
        /**
         * 3、加入表的分片规则
         */
        ShardingRuleConfiguration shardingRuleConfig = new ShardingRuleConfiguration();
        shardingRuleConfig.getTableRuleConfigs().add(userRuleConfiguration);
        /**
         * 4、配置一些属性
         */
        Properties props = new Properties();
        //输出sql
        props.put(ConfigurationPropertyKey.SQL_SHOW.getKey(), true);
        /**
         * 5、创建数据源
         */
        dataSource = ShardingDataSourceFactory.createDataSource(dataSourceMap, shardingRuleConfig, props);
    }

    #测试1:插入4条数据,看sql路由情况
    @Test
    public void test1() throws SQLException {
        String sql = "insert t_user (id,name) value (?,?)";
        try (Connection connection = dataSource.getConnection();
             PreparedStatement ps = connection.prepareStatement(sql);) {
            for (long id = 1; id <= 4; id++) {
                int parameterIndex = 1;
                ps.setLong(parameterIndex++, id);
                ps.setString(parameterIndex++, "路人-" + id);
                ps.executeUpdate();
            }
        }
    }

    #测试2:批量插入数据,看sql路由情况
    #验证insert t_user (id,name) value (?,?), (?,?), (?,?), (?,?)插入效果
    @Test
    public void test2() throws SQLException {
        String sql = "insert t_user (id,name) value (?,?), (?,?), (?,?), (?,?)";
        try (Connection connection = dataSource.getConnection();
             PreparedStatement ps = connection.prepareStatement(sql);) {
            int parameterIndex = 1;
            for (long id = 1; id <= 4; id++) {
                ps.setLong(parameterIndex++, id);
                ps.setString(parameterIndex++, "路人-" + id);
            }
            System.out.println("count:" + ps.executeUpdate());
        }
    }

    #测试3:查询所有数据
    @Test
    public void test3() throws SQLException {
        String sql = "select id,name from t_user";
        try (Connection connection = dataSource.getConnection();
             PreparedStatement ps = connection.prepareStatement(sql);
             ResultSet rs = ps.executeQuery();) {
            while (rs.next()) {
                final long id = rs.getLong("id");
                final String name = rs.getString("name");
                System.out.println(String.format("id:%s,name:%s", id, name));
            }
        }
    }

    #测试4:查询id为1的用户
    @Test
    public void test4() throws SQLException {
        String sql = "select id,name from t_user where id = 1";
        try (Connection connection = dataSource.getConnection();
             PreparedStatement ps = connection.prepareStatement(sql);
             ResultSet rs = ps.executeQuery();) {
            while (rs.next()) {
                final long id = rs.getLong("id");
                final String name = rs.getString("name");
                System.out.println(String.format("id:%s,name:%s", id, name));
            }
        }
    }

    #测试5:in 查询多个用户
    @Test
    public void test5() throws SQLException {
        String sql = "select id,name from t_user where id in (1,2,4)";
        try (Connection connection = dataSource.getConnection();
             PreparedStatement ps = connection.prepareStatement(sql);
             ResultSet rs = ps.executeQuery();) {
            while (rs.next()) {
                final long id = rs.getLong("id");
                final String name = rs.getString("name");
                System.out.println(String.format("id:%s,name:%s", id, name));
            }
        }
    }

    #测试6:!=查询
    #!=,not in,<>,这种类型的,由于分片规则不知道查询的数据具体在哪个库哪个表,所以会路由到所有表。
    @Test
    public void test6() throws SQLException {
        String sql = "select id,name from t_user where id != 1";
        try (Connection connection = dataSource.getConnection();
             PreparedStatement ps = connection.prepareStatement(sql);
             ResultSet rs = ps.executeQuery();) {
            while (rs.next()) {
                final long id = rs.getLong("id");
                final String name = rs.getString("name");
                System.out.println(String.format("id:%s,name:%s", id, name));
            }
        }
    }

    #测试7:支持范围查询
    #InlineShardingStrategy策略不支持对分片字段采用>=、<=、>、<、BETWEEN查询
    @Test
    public void test7() throws SQLException {
        String sql = "select id,name from t_user where id between 1 and 2";
        try (Connection connection = dataSource.getConnection();
             PreparedStatement ps = connection.prepareStatement(sql);
             ResultSet rs = ps.executeQuery();) {
            while (rs.next()) {
                final long id = rs.getLong("id");
                final String name = rs.getString("name");
                System.out.println(String.format("id:%s,name:%s", id, name));
            }
        }
    }

    #测试8:复合条件(between & or)
    @Test
    public void test8() throws SQLException {
        String sql = "select id,name from t_user where id between 1 and 2 or id>=4";
        try (Connection connection = dataSource.getConnection();
             PreparedStatement ps = connection.prepareStatement(sql);
             ResultSet rs = ps.executeQuery();) {
            while (rs.next()) {
                final long id = rs.getLong("id");
                final String name = rs.getString("name");
                System.out.println(String.format("id:%s,name:%s", id, name));
            }
        }
    }
}
四、常见其他
4.1 广播表
有时候,某些表需要在所有库中都有一个,且数据是一样的,比如字典表,这种表,插入表,所有表都会写入数据,而查询时,选择一个就可以了,这种场景需要用到shardingsphere中的广播表。
如何使用:
需要广播的表,需要调用shardingRuleConfig.setBroadcastTable进行设置。
代码如下,广播的表,插入数据会同时落到所有的库,查询只会落到一个库。
ShardingRuleConfiguration shardingRuleConfig = new ShardingRuleConfiguration();
// 这里需要指定t_dict为广播模式
shardingRuleConfig.setBroadcastTables(Arrays.asList("t_dict"));
4.2 表关联
指分片规则一致的主表和子表。例如:t_order表和t_order_item表,均按照order_id分片,则此两张表互为绑定表关系。绑定表之间的多表关联查询不会出现笛卡尔积关联,关联查询效率将大大提升。举例说明,如果SQL为:
SELECT i.* FROM t_order o JOIN t_order_item i ON o.order_id=i.order_id WHERE o.order_id in (10, 11);
在不配置绑定表关系时,假设分片键order_id将数值10路由至第0片,将数值11路由至第1片,那么路由后的SQL应该为4条,它们呈现为笛卡尔积:
SELECT i.* FROM t_order_0 o JOIN t_order_item_0 i ON o.order_id=i.order_id WHERE o.order_id in (10, 11);
SELECT i.* FROM t_order_0 o JOIN t_order_item_1 i ON o.order_id=i.order_id WHERE o.order_id in (10, 11);
SELECT i.* FROM t_order_1 o JOIN t_order_item_0 i ON o.order_id=i.order_id WHERE o.order_id in (10, 11);
SELECT i.* FROM t_order_1 o JOIN t_order_item_1 i ON o.order_id=i.order_id WHERE o.order_id in (10, 11);
在配置绑定表关系后,路由的SQL应该为2条:
SELECT i.* FROM t_order_0 o JOIN t_order_item_0 i ON o.order_id=i.order_id WHERE o.order_id in (10, 11);
SELECT i.* FROM t_order_1 o JOIN t_order_item_1 i ON o.order_id=i.order_id WHERE o.order_id in (10, 11);
其中t_order在FROM的最左侧,ShardingSphere将会以它作为整个绑定表的主表。 所有路由计算将会只使用主表的策略,那么t_order_item表的分片计算将会使用t_order的条件。故绑定表之间的分区键要完全相同。
案例如下:
1)需求
ds_order库有4张表,2张订单表,2张订单明细表
2张订单表:t_order_0(存放id为奇数的数据)、t_order_1(存放id为偶数的数据)
2张订单明细表:t_order_0(存放order_id为奇数的数据,和t_order_0分片规则一致)、t_order_1(存放order_id为偶数的数据,和t_order_1分片规则一致)
2)sql脚本
drop database if exists ds_order;
create database ds_order;
use ds_order;
drop table if exists t_order_0;
create table t_order_0(
    order_id bigint not null primary key,
    price int not null
);
drop table if exists t_order_1;
create table t_order_1(
    order_id bigint not null primary key,
    price int not null
);
drop table if exists t_order_item_0;
create table t_order_item_0(
    id bigint not null primary key,
  order_id bigint not null,
    price int not null
);
create index idx_order_id on t_order_item_0(order_id);
drop table if exists t_order_item_1;
create table t_order_item_1(
    id bigint not null primary key,
    order_id bigint not null,
    price int not null
);
create index idx_order_id on t_order_item_1(order_id);
insert into t_order_0 values (1,20);
insert into t_order_1 values (2,30);
insert into t_order_item_0 values (1,1,5),(2,1,15);
insert into t_order_item_1 values (3,2,10),(4,2,20);
3)java代码:BindingTableGroupsTest
代码如下,关键代码就是配置了2张表(t_order、t_order_item)的分片策略
@Slf4j
public class BindingTableGroupsTest {
    private static DataSource dataSource;
    @BeforeAll
    public static void init() throws SQLException {
        HikariDataSource ds = new HikariDataSource();
        ds.setDriverClassName("com.mysql.jdbc.Driver");
        ds.setJdbcUrl("jdbc:mysql://localhost:3306/ds_order?characterEncoding=UTF-8");
        ds.setUsername("root");
        ds.setPassword("root123");
        /**
         * 1.配置真实数据源
         */
        Map<String, DataSource> dataSourceMap = new LinkedHashMap<>();
        dataSourceMap.put("ds", ds);
        /**
         * 2、配置2个表的分片规则
         */
        //t_order分片规则
        TableRuleConfiguration orderRuleConfiguration =
                new TableRuleConfiguration("t_order", "ds.t_order_$->{0..1}");
        InlineShardingStrategyConfiguration orderTableShardingStrategy =
                new InlineShardingStrategyConfiguration("order_id", "t_order_$->{(order_id + 1) % 2}");
        orderRuleConfiguration.setTableShardingStrategyConfig(orderTableShardingStrategy);
        //t_order_item分片规则
        TableRuleConfiguration orderItemRuleConfiguration =
                new TableRuleConfiguration("t_order_item", "ds.t_order_item_$->{0..1}");
        InlineShardingStrategyConfiguration orderItemTableShardingStrategy =
                new InlineShardingStrategyConfiguration("order_id", "t_order_item_$->{(order_id + 1) % 2}");
        orderItemRuleConfiguration.setTableShardingStrategyConfig(orderItemTableShardingStrategy);
        /**
         * 3、加入表的分片规则
         */
        ShardingRuleConfiguration shardingRuleConfig = new ShardingRuleConfiguration();
        shardingRuleConfig.getTableRuleConfigs().add(orderRuleConfiguration);
        shardingRuleConfig.getTableRuleConfigs().add(orderItemRuleConfiguration);
        /**
         * 关键代码为设置2个表关联
         * 当2个表的路由字段相同的时候,可以设置表关联,可以避免笛卡尔积查询,下面设置t_order和t_order_item关联
         */
        shardingRuleConfig.setBindingTableGroups(Arrays.asList("t_order","t_order_item"));
        /**
         * 4、配置一些属性
         */
        Properties props = new Properties();
        //输出sql
        props.put(ConfigurationPropertyKey.SQL_SHOW.getKey(), true);
        /**
         * 5、创建数据源
         */
        dataSource = ShardingDataSourceFactory.createDataSource(dataSourceMap, shardingRuleConfig, props);
    }
}
4)测试:查询
@Test
public void test1() throws SQLException {
    String sql = "select a.order_id,b.id as order_item_id,b.price " +
        "from t_order a,t_order_item b " +
        "where a.order_id = b.order_id and a.order_id = 1";
    try (Connection connection = dataSource.getConnection();
         PreparedStatement ps = connection.prepareStatement(sql);
         ResultSet rs = ps.executeQuery();) {
        while (rs.next()) {
            Long order_id = rs.getLong("order_id");
            Long order_item_id = rs.getLong("order_item_id");
            Integer price = rs.getInt("price");
            System.out.println(String.format("order_id:%s,order_item_id:%s, price:%s", order_id, order_item_id, price));
        }
    }
}
4.3 读写分离+分片
案例1:无事务读取落入从库
案例2:事务中直接读取落入从库
案例3:事务中写入之后读取落入主库
案例4:通过HintManager强制查询走主库
4.4 yml和springboot集成
4.4.1 yml方式集成
纯java api的方式,写起来比较繁琐,shardingsphere为我们提供了更简单的方式:yml配置文件的方式。
1、使用步骤
创建一个yml格式的文件,将分库分表信息配置到yml中
通过yml文件创建DataSource
使用DataSource执行db操作
2、参考文档
https://shardingsphere.apache.org/document/legacy/4.x/document/cn/manual/sharding-jdbc/configuration/config-yaml/
4.4.2 springboot集成
1. 引入jar

    <dependency>
        <groupId>org.apache.shardingsphere</groupId>
        <artifactId>sharding-jdbc-spring-boot-starter</artifactId>
        <version>4.1.1</version>
    </dependency>

2. application.properties中配置分库分表信息

    spring.shardingsphere.datasource.names=ds0,ds1
    spring.shardingsphere.datasource.ds0.type=com.zaxxer.hikari.HikariDataSource
    spring.shardingsphere.datasource.ds0.driver-class-name=com.mysql.jdbc.Driver
    spring.shardingsphere.datasource.ds0.jdbc-url=jdbc:mysql://localhost:3306/sj_ds0?characterEncoding=UTF-8
    spring.shardingsphere.datasource.ds0.username=root
    spring.shardingsphere.datasource.ds0.password=root123
    spring.shardingsphere.datasource.ds1.type=com.zaxxer.hikari.HikariDataSource
    spring.shardingsphere.datasource.ds1.driver-class-name=com.mysql.jdbc.Driver
    spring.shardingsphere.datasource.ds1.jdbc-url=jdbc:mysql://localhost:3306/sj_ds1?characterEncoding=UTF-8
    spring.shardingsphere.datasource.ds1.username=root
    spring.shardingsphere.datasource.ds1.password=root123
    spring.shardingsphere.sharding.tables.t_order.actual-data-nodes=ds$->{0..1}.t_order_$->{0..1}
    spring.shardingsphere.sharding.tables.t_order.database-strategy.inline.sharding-column=user_id
    spring.shardingsphere.sharding.tables.t_order.database-strategy.inline.algorithm-expression=ds$->{user_id % 2}
    spring.shardingsphere.sharding.tables.t_order.table-strategy.inline.sharding-column=order_id
    spring.shardingsphere.sharding.tables.t_order.table-strategy.inline.algorithm-expression=t_order_$->{order_id % 2}
    spring.shardingsphere.props.sql.show: true

3. 创建测试类

    import lombok.extern.slf4j.Slf4j;
    import org.junit.jupiter.api.Test;
    import org.springframework.beans.factory.annotation.Autowired;
    import org.springframework.boot.test.context.SpringBootTest;
    import javax.sql.DataSource;
    import java.sql.Connection;
    import java.sql.PreparedStatement;
    import java.sql.ResultSet;
    import java.sql.SQLException;
    @SpringBootTest
    @Slf4j
    class SpringbootDemoApplicationTests {
        @Autowired
        private DataSource dataSource;


    @Test
    void test1() throws Exception {
        String sql = "insert into t_order (order_id,user_id,price) values (?,?,?)";
        try (Connection connection = this.dataSource.getConnection();
             PreparedStatement ps = connection.prepareStatement(sql);) {
            // 插入4条数据测试,每个表会落入1条数据
            for (long user_id = 1; user_id <= 2; user_id++) {
                for (long order_id = 1; order_id <= 2; order_id++) {
                    int j = 1;
                    ps.setLong(j++, order_id);
                    ps.setLong(j++, user_id);
                    ps.setLong(j, 100);
                    log.info("count:{}", ps.executeUpdate());
                }
            }
        }
    }

    }

4. 参考文档
https://shardingsphere.apache.org/document/legacy/4.x/document/cn/manual/sharding-jdbc/configuration/config-spring-boot/
4.5 最新5.x版本
2022.8月,ShardingSphere当前最新版本是 5.1.2,相对于版本4变化挺大的,代码基本重构了,扩展了很多新功能,整个系统的扩展性更强了,不过核心原理没有变,所以还是建议先看下前面12篇,然后再看本文,这样会更轻松。
如果直接去看官方文档,快速上手还是有点难度的,所以有了这篇文章,本文基于 5.1.2 版,通过案例介绍其用法,引导大家如何使用,顺便会介绍如何去学习其他功能的用法。
官方文档:https://shardingsphere.apache.org/document/current/cn/overview/
案例如下:
1)需求
ds_shardingsphere5 库中有2个用户表:t_user_0,t_user_1,表中有2个字段(id:用户编号,name:姓名)
这2个表的分片规则:
t_user_0:存放id为偶数的用户数据
t_user_1:存放id为奇数的用户数据
下面来看具体实现
2)执行sql脚本
drop database if exists ds_shardingsphere5;
create database ds_shardingsphere5;
use ds_shardingsphere5;
drop table if exists t_user_0;
create table t_user_0(
    id bigint not null primary key,
    name varchar(128) not null
);
drop table if exists t_user_1;
create table t_user_1(
    id bigint not null primary key,
    name varchar(128) not null
);
3)项目中引入maven配置
<dependency>
    <groupId>org.apache.shardingsphere</groupId>
    <artifactId>shardingsphere-jdbc-core</artifactId>
    <version>5.1.2</version>
</dependency>
4)创建测试类
代码如下,有些地方可能大家看不懂,不过没关系,稍后会介绍。
public class Test1 {
    static DataSource dataSource;
    //@BeforeAll 标注的方法会在  @Test 标注的方法被执行前执行一次
    @BeforeAll
    public static void init() throws SQLException {
        /**
         * 1、创建datasource
         */
        Map<String, DataSource> dataSourceMap = createDataSources();
        /**
         * 2、构建具体规则
         */
        Collection<RuleConfiguration> ruleConfigs = new ArrayList<>();
        /**
         * 2.1、创建分片规则
         */
        ShardingRuleConfiguration shardingRuleConfiguration = new ShardingRuleConfiguration();
        //2.2、创建t_user表的分片规则
        ShardingTableRuleConfiguration userShardingTableRuleConfiguration =
                new ShardingTableRuleConfiguration("t_user", //逻辑表
                        "ds1.t_user_$->{0..1}"); //实际数据节点
        //2.3、配置t_user的分表规则,分片字段是:user_id,分片算法是:userShardingAlgorithm(这个算法名称是自定义的,后面会定义这个名称对应的具体算法)
        userShardingTableRuleConfiguration.setTableShardingStrategy(
                new StandardShardingStrategyConfiguration(
                        "id",
                        "userShardingAlgorithm"));
        //2.4、将t_user表的分片规则加入到shardingRuleConfiguration中
        shardingRuleConfiguration.getTables().add(userShardingTableRuleConfiguration);
        //2.5、定义分片
        Properties userShardingAlgorithmProperties = new Properties();
        userShardingAlgorithmProperties.put(
                "algorithm-expression",
                "t_user_$->{id%2}"
        );
        ShardingSphereAlgorithmConfiguration userShardingAlgorithm =
                new ShardingSphereAlgorithmConfiguration("INLINE",
                        userShardingAlgorithmProperties);
        //2.6、将定义好的 userShardingAlgorithm 算法加入到算法列表中(算法名称->算法)
        shardingRuleConfiguration.getShardingAlgorithms().
                put("userShardingAlgorithm", userShardingAlgorithm);
        //2.7、将分片规则加入规则列表
        ruleConfigs.add(shardingRuleConfiguration);
        /**
         * 3、建属性配置
         */
        Properties props = new Properties();
        props.put(ConfigurationPropertyKey.SQL_SHOW.getKey(), "true");
        /**
         * 4、创建数据源
         */
        dataSource = ShardingSphereDataSourceFactory.createDataSource(
                "shardingsphere-demo-db",
                null,
                dataSourceMap,
                ruleConfigs,
                props);
    }
    private static Map<String, DataSource> createDataSources() {
        Map<String, DataSource> dataSourceMap = new HashMap<>();
        // 配置第 1 个数据源
        HikariDataSource dataSource1 = new HikariDataSource();
        dataSource1.setDriverClassName("com.mysql.jdbc.Driver");
        dataSource1.setJdbcUrl("jdbc:mysql://localhost:3306/ds_shardingsphere5?characterEncoding=UTF-8");
        dataSource1.setUsername("root");
        dataSource1.setPassword("root123");
        dataSourceMap.put("ds1", dataSource1);
        return dataSourceMap;
    }
}
5)测试:插入
执行下面测试方法之前,先执行下上面的的sql脚本,清理下数据。
下面代码将插入2条数据,按照路由规则,会被路由到不同的用户表,这些信息都会包含在运行结果中,注意看运行结果
@Test
public void m1() throws Exception {
    String sql = "insert into t_user values (?,?),(?,?)";
    try (Connection connection = dataSource.getConnection();) {
        connection.setAutoCommit(false);
        PreparedStatement ps = connection.prepareStatement(sql);
        int parameterIndex = 1;
        ps.setInt(parameterIndex++, 1);
        ps.setString(parameterIndex++, "user-1");
        ps.setInt(parameterIndex++, 2);
        ps.setString(parameterIndex++, "user-2");
        ps.executeUpdate();
        connection.commit();
    }
}
运行输出,如下,id为1的被路由到了t_user_1中,id为2的被路由到了t_user_0中
Logic SQL: insert into t_user values (?,?),(?,?)
Actual SQL: ds1 ::: insert into t_user_1 values (?, ?) ::: [1, user-1]
Actual SQL: ds1 ::: insert into t_user_0 values (?, ?) ::: [2, user-2]
6)测试:查询id为1的用户
@Test
public void m2() throws Exception {
    String sql = "select id,name from t_user where id = 1";
    try (Connection connection = dataSource.getConnection();
         PreparedStatement ps = connection.prepareStatement(sql);) {
        ResultSet rs = ps.executeQuery();
        while (rs.next()) {
            long id = rs.getLong("id");
            String name = rs.getString("name");
            System.out.println(String.format("id:%s, name:%s", id, name));
        }
    }
}
运行输出,如下,id为1的被路由到了t_user_1表
Logic SQL: select id,name from t_user where id = 1
Actual SQL: ds1 ::: select id,name from t_user_1 where id = 1
id:1, name:user-1
7)问题
问题1:上图中具体用的是什么算法呢?
用的是org.apache.shardingsphere.sharding.algorithm.sharding.inline.InlineShardingAlgorithm这个算法类
问题2:红圈中的 INLINE 字符串是什么意思?
INLINE 并不是乱写的,系统会通过INLINE找到其对应的算法类,即InlineShardingAlgorithm这算法。
问题3:系统是如何通过INLINE找到InlineShardingAlgorithm的?
通过SPI机制找到的,SPI简单来说:通过SPI提供的方法,可以在程序中找到某个接口的所有实现类,并且会将这些实现类都进行实例化,返回返回给调用者。
SPI工作机制:
1、调用者给spi传入一个接口
2、SPI会在当前项目中以及所有的jar中找/META-INF/services/接口完整名称这些文件,这些文件中定义了这个接口具体的实现类列表。
3、读取这些文件,得到实现类列表,然后通过反射将这些类实例化,返回给调用者
问题4:INLINE 这个名称是在哪里定义的呢?
这要说一下shardingsphere中的spi机制了,shardingsphere中有个spi接口:org.apache.shardingsphere.spi.type.typed.TypedSPI,源码如下
public interface TypedSPI {
    /**
     * Get type.
     *
     * @return type
     */
    default String getType() {
        return "";
    }
    /**
     * Get type aliases.
     *
     * @return type aliases
     */
    default Collection<String> getTypeAliases() {
        return Collections.emptyList();
    }
}
shardingsphere所有需要使用SPI功能的接口都必须继承上面这个接口,实现类需要实现2个方法了,而使用方可以通过type或者aliases(别名)找到具体的实现类了。
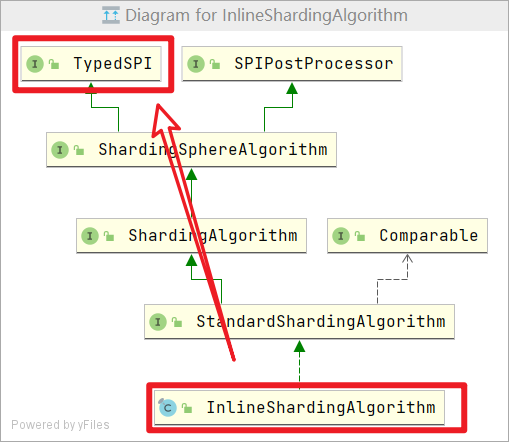
INLINE对应org.apache.shardingsphere.sharding.algorithm.sharding.inline.InlineShardingAlgorithm类,这个类实现了TypedSPI接口,uml图如下
其type方法如下,清晰了吧
@Override
public String getType() {
    return "INLINE";
}
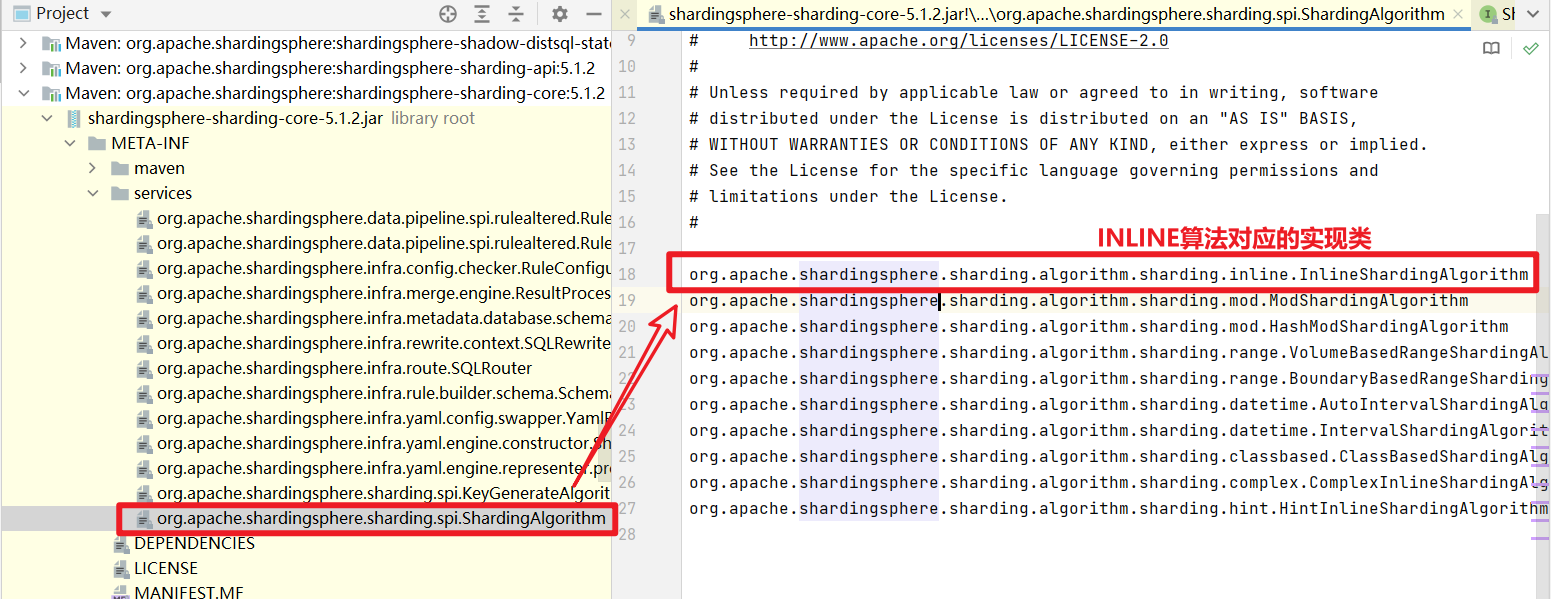
上面的UML图中还可以看出:InlineShardingAlgorithm 还实现了ShardingAlgorithm 接口,而InlineShardingAlgorithm接口对应的spi文件在shardingsphere-sharding-core-5.1.2.jar/META/service/org.apache.shardingsphere.sharding.spi.ShardingAlgorithm中,如下:这里面列出了shardingsphere为我们提供的所有常见的算法,建议都看一遍
到这里大家都明了了。
若要使用其他算法,只需去看org.apache.shardingsphere.sharding.spi.ShardingAlgorithm接口实现类,以及其type方法返回值,就可以了,通过type的值便引用到具体的算法,大家自行发挥。
问题5:SPI得到的实例对象的属性如何设置?
通过spi创建出来的对象,他们内部有很多属性,这些属性的值如何设置呢?
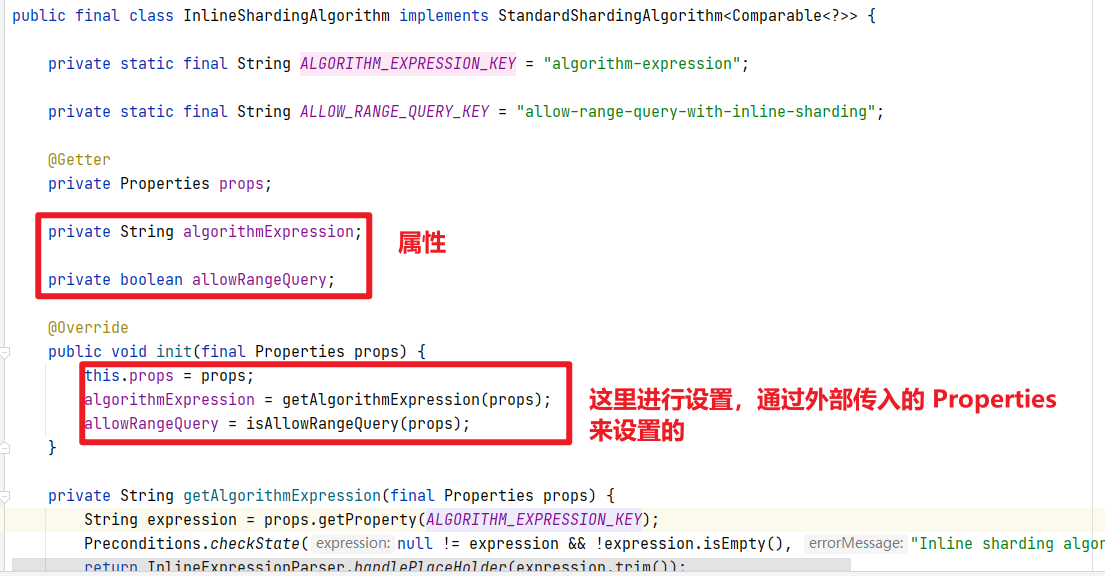
比如INLINE对应的InlineShardingAlgorithm类,源码如下,其内部有2个属性需要设置,这2个属性是根据init方法传入的Properties来设置的,外部需要传入一个Properteis对象,这个在哪定义的呢?继续向下看
algorithmExpression属性是通过getAlgorithmExpression(props)实现的,源码如下
private static final String ALGORITHM_EXPRESSION_KEY = "algorithm-expression";
private String getAlgorithmExpression(final Properties props) {
    String expression = props.getProperty(ALGORITHM_EXPRESSION_KEY);
    Preconditions.checkState(null != expression && !expression.isEmpty(), "Inline sharding algorithm expression cannot be null or empty.");
    return InlineExpressionParser.handlePlaceHolder(expression.trim());
}
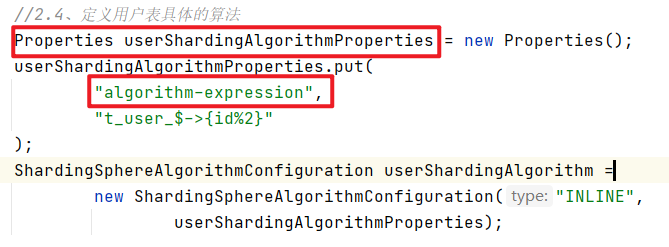
重点在props.getProperty(ALGORITHM_EXPRESSION_KEY)这行,而ALGORITHM_EXPRESSION_KEY是个常量,其值是algorithm-expression,最终algorithmExpression的值来源于props.getProperty(“algorithm-expression”),这部分信息和测试案例中的代码遥相呼应,如下,红框中的内容就是用来定义InlineShardingAlgorithm类中属性的值的,一目了然了吧。
shardingsphere中spi扩展的类,其属的值都是通过Properties来指定的。
版权属于:sunjianhua
本文链接:https://sunjianhua.cn/archives/java-shardingsphere.html
转载时须注明出处及本声明,如果不小心侵犯了您的权益,请联系邮箱:NTA2MTkzNjQ1QHFxLmNvbQ==

